
In this article, you will learn how to build your Contact page. That will include two new elements on the WPBakery Page Builder (formerly Visual Composer) area, Map and Contact Form element. We covered all the settings in the video, but if you want to know what settings you can find there you can read this article.
We will start this tutorial with the Map element, then we will continue with the Contact Form element.
Map element
- Make sure that you have clicked Backend Editor button on the WPBakery Page Builder (formerly Visual Composer) area.
- Click on the Add Element button to continue.
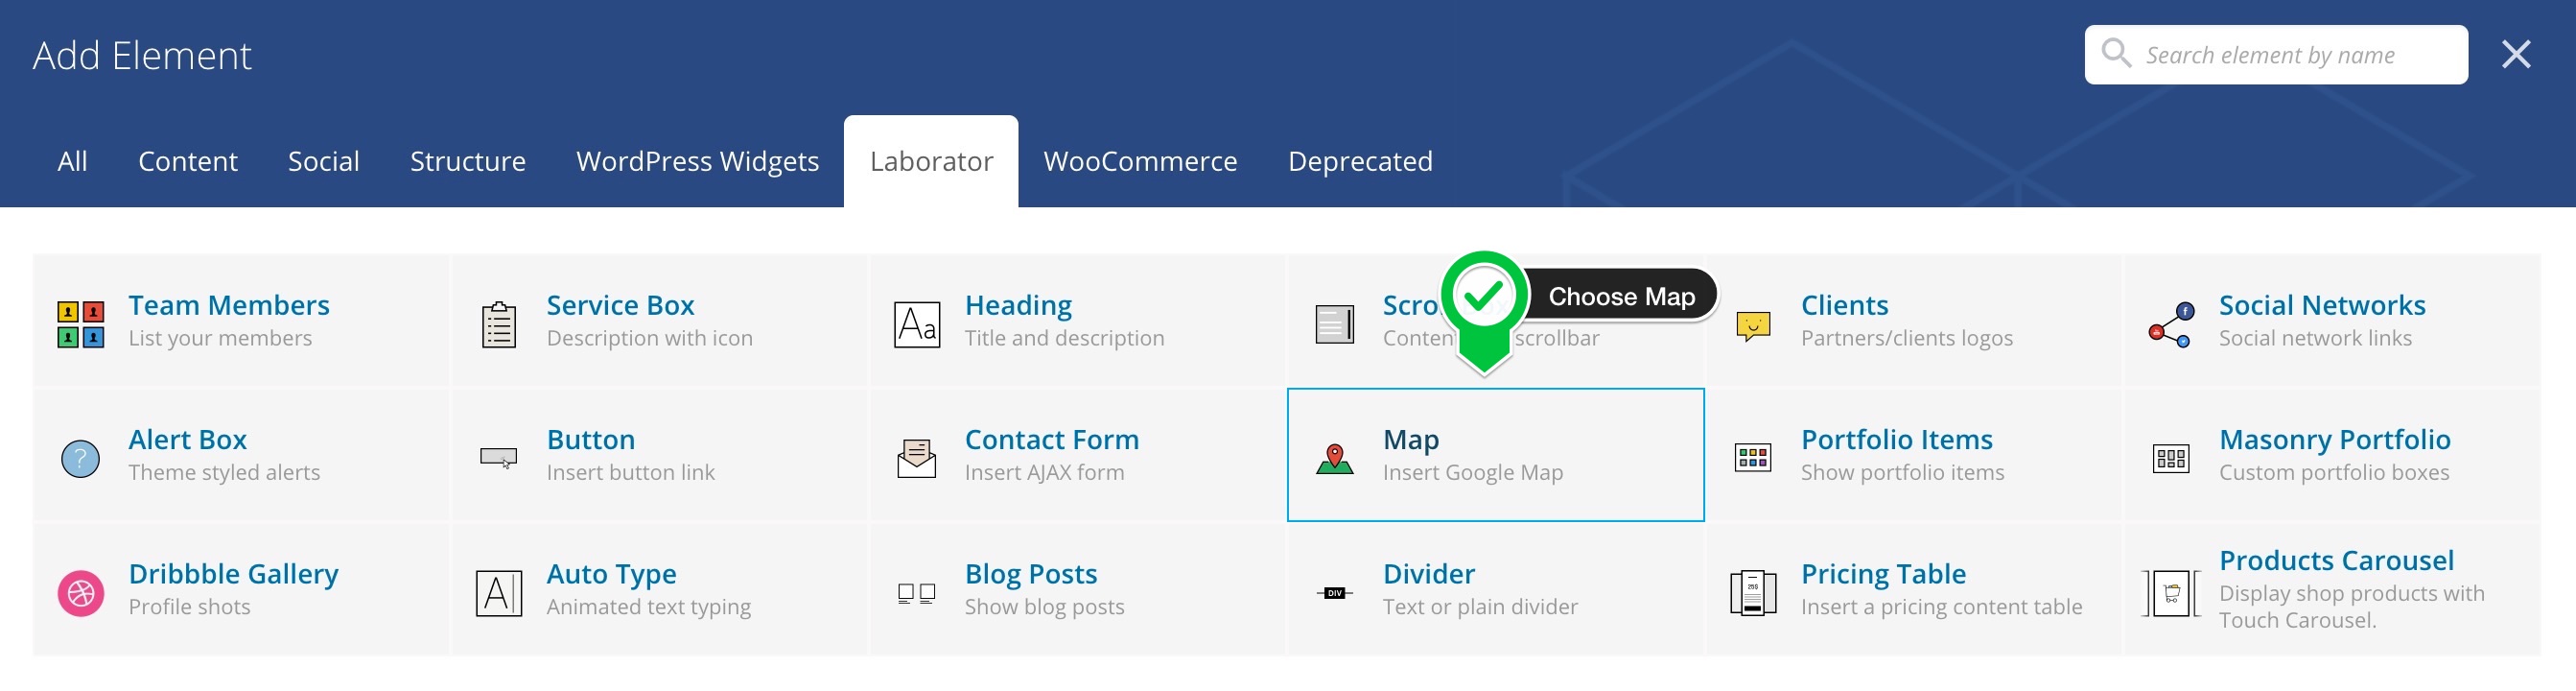
- Then when the Add Elements area appear just click the Laborator tab
- Choose Map element.
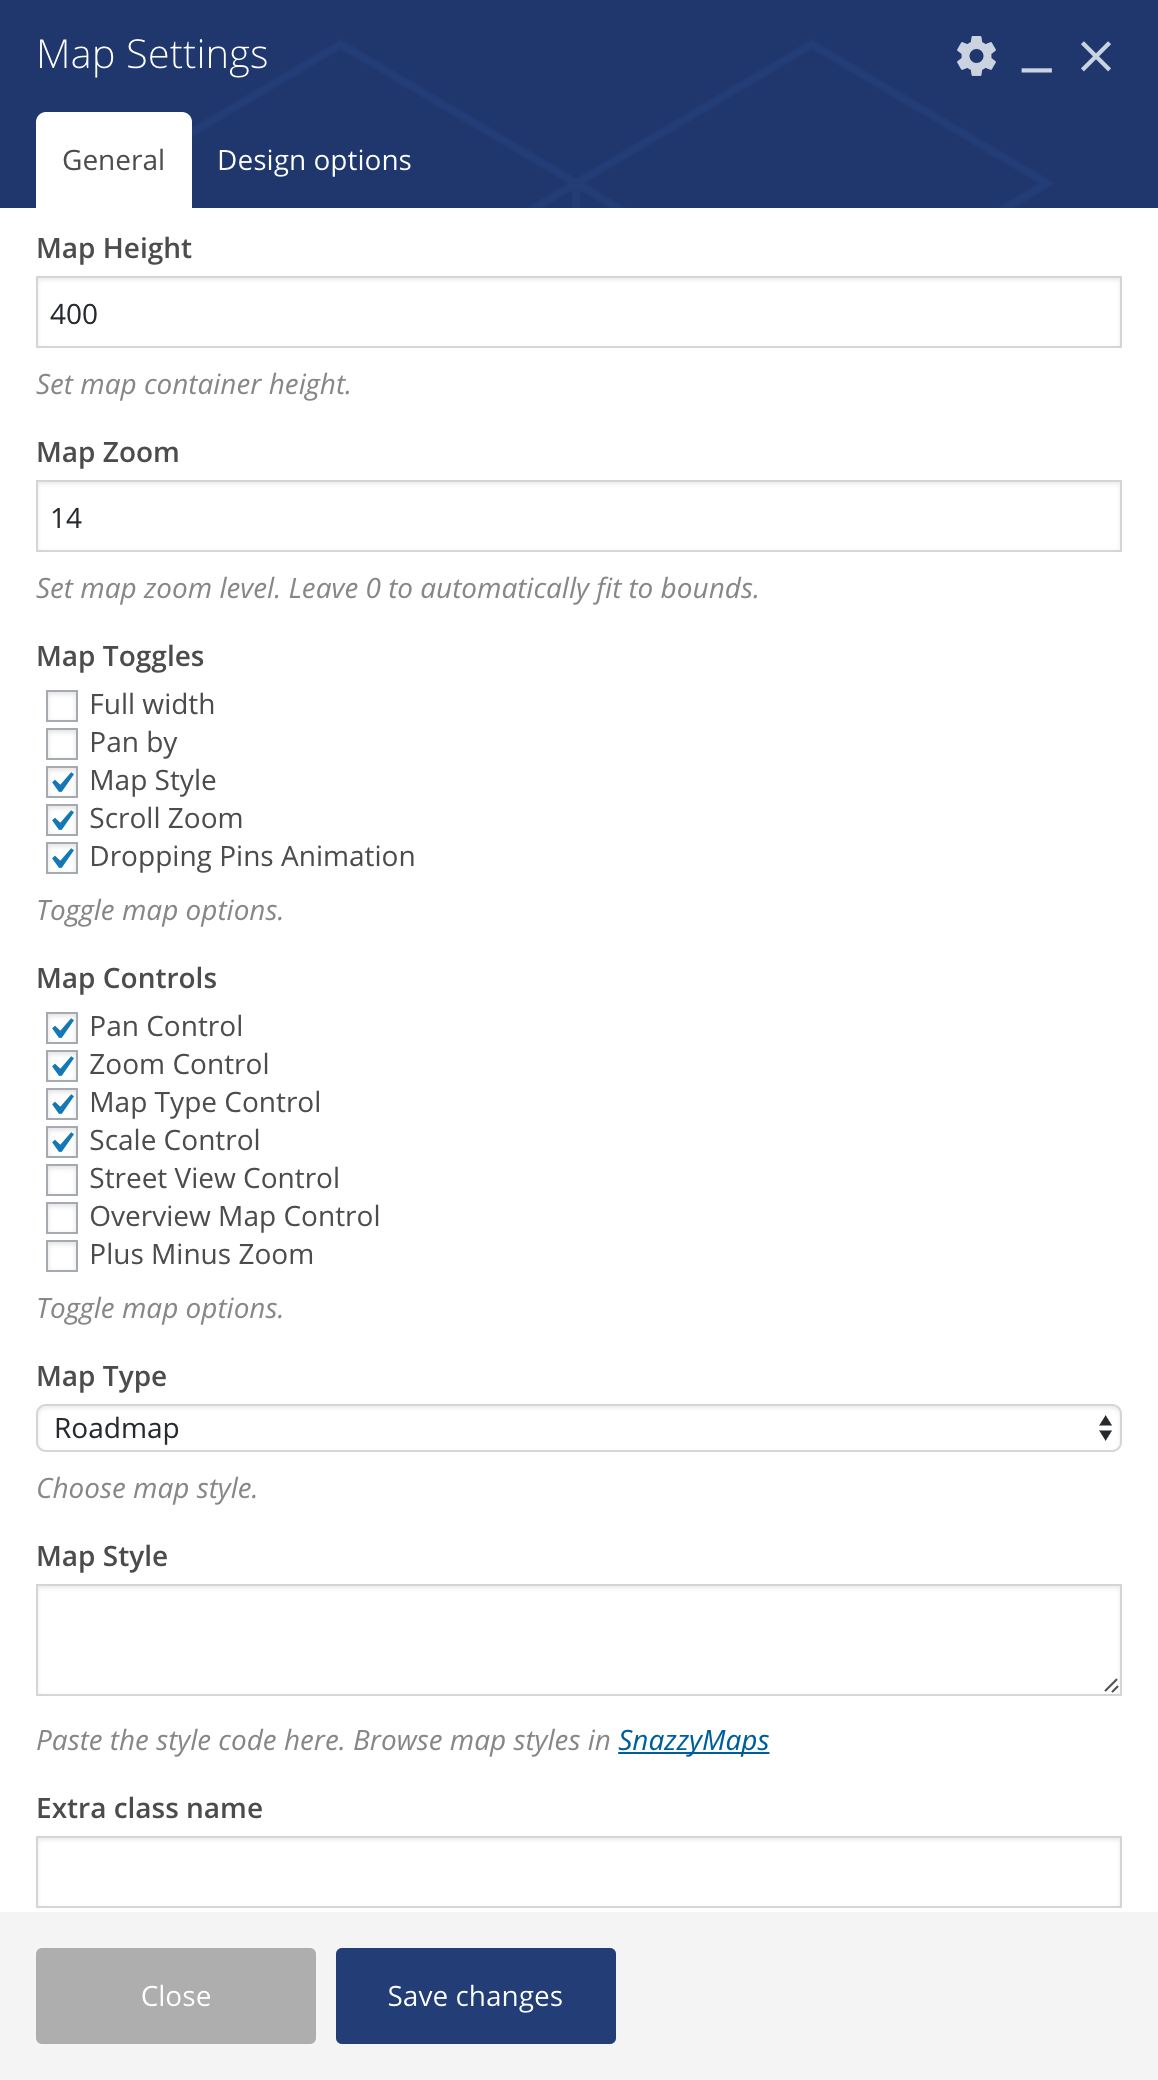
- Map Settings popup will appear and the options to choose are those:
Map Settings
- Map Height — Set map container height.
- Map Zoom — Set map zoom level. Leave 0 to automatically fit bounds.
- Map Toggles — There you can tick some options that are offered such as Full width, Pan by, Scroll Zoom and Dropping Pins Animation
- Map Controls — Choose what Map control buttons you want to show. Options are Pan Control, Zoom Control, Map Type Control, Scale Control, Street View Control, Overview Map Control and Plus Minus Zoom.
- Map Type — Choose what type of map you want to show, Roadmap, Satellite, or Hybrid.
- Map Style — You can apply a style (skin) on your map. Browse map styles in Snazzy Maps, copy the code and then paste the style code there.
- Extra class name —If you wish to style particular content element differently, then use this field to add a class name and then refer to it in your Custom CSS area. This field appears on every WPBakery Page Builder element.
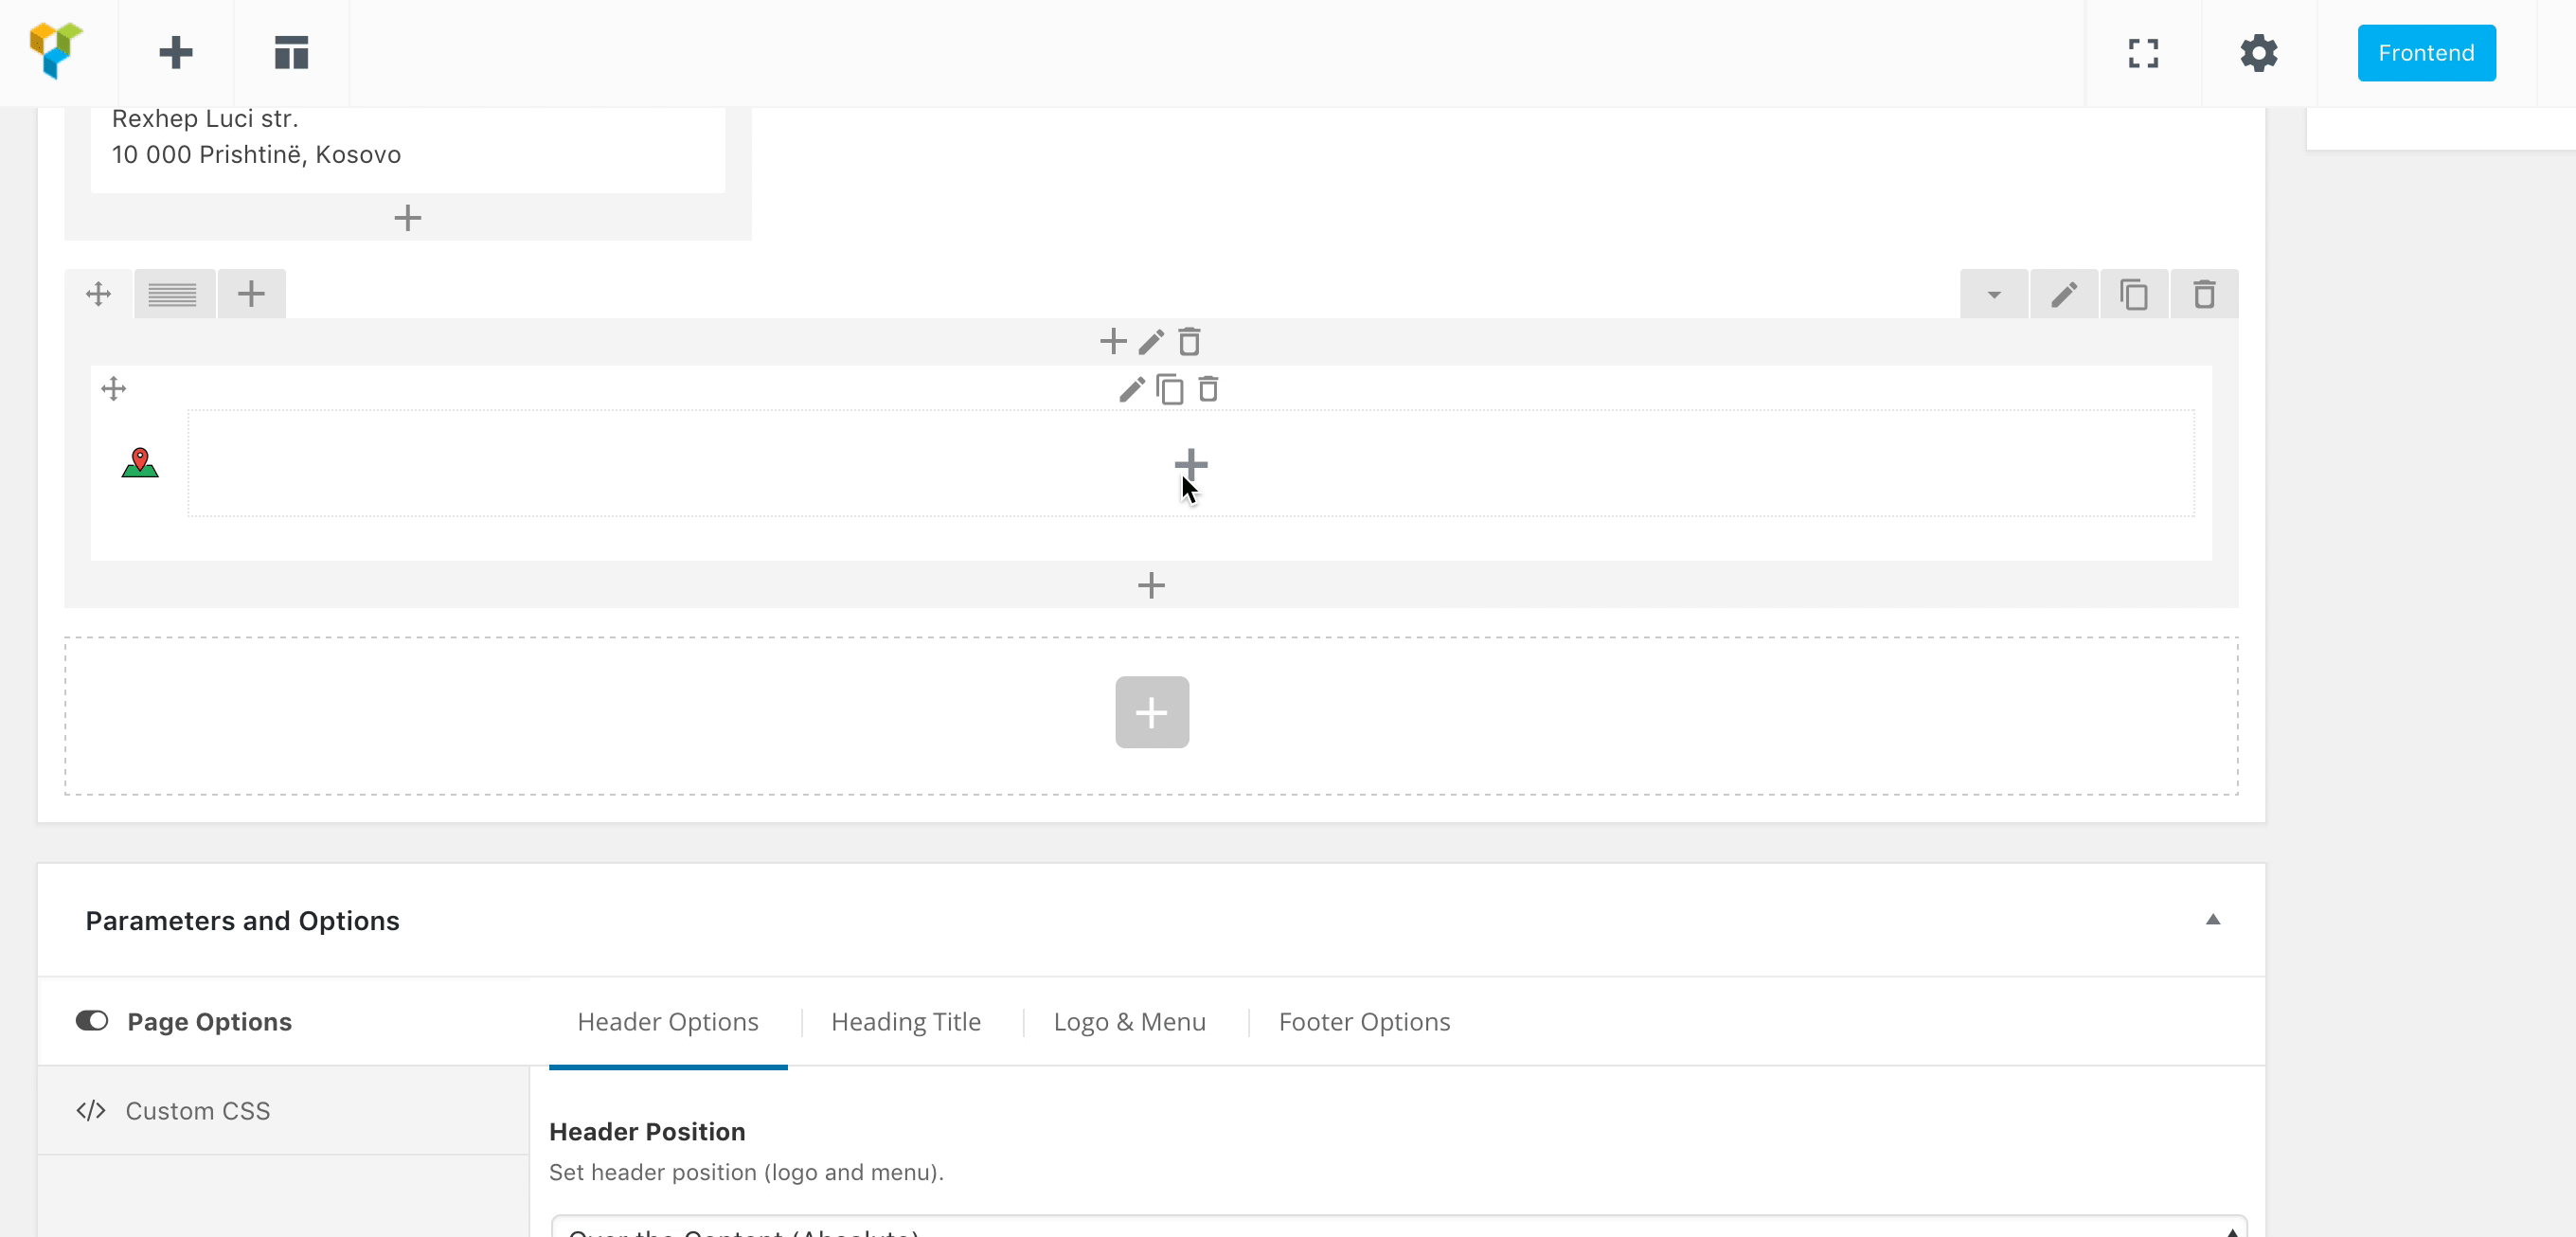
When you finish those settings then you can add the Map Location (example). The options that you will see there are:
Map Location Settings
- Marker Image — Add your Custom marker image (or Pin) or use default one.
- Retina Marker — Enabling this option will reduce the size of marker for 50%, for example, if the marker is 32×32 it will be 16×16. This will show that icon crisp on Retina and HiDPI screens.
- Latitude — Enter latitude coordinate of your location. To select map coordinates open this site.
- Longitude — Enter longitude coordinate.
- Marker Title — If you want to add a title to your marker (Optional).
- Marker Description — If you want to add a title to your marker (Optional).
Note: Google Maps require a unique API key for each site, to learn more please read Google API Key article. API key should be set in Theme Options > Other Settings.
If you see an error: Ooops! Something went wrong that means that you haven’t added Google Maps API Key, to learn more about this please read Fix the missing Google Maps API key article.
Contact Form element
- Make sure that you have clicked Backend Editor button on the WPBakery Page Builder (formerly Visual Composer) area.
- Click on the Add Element button to continue.
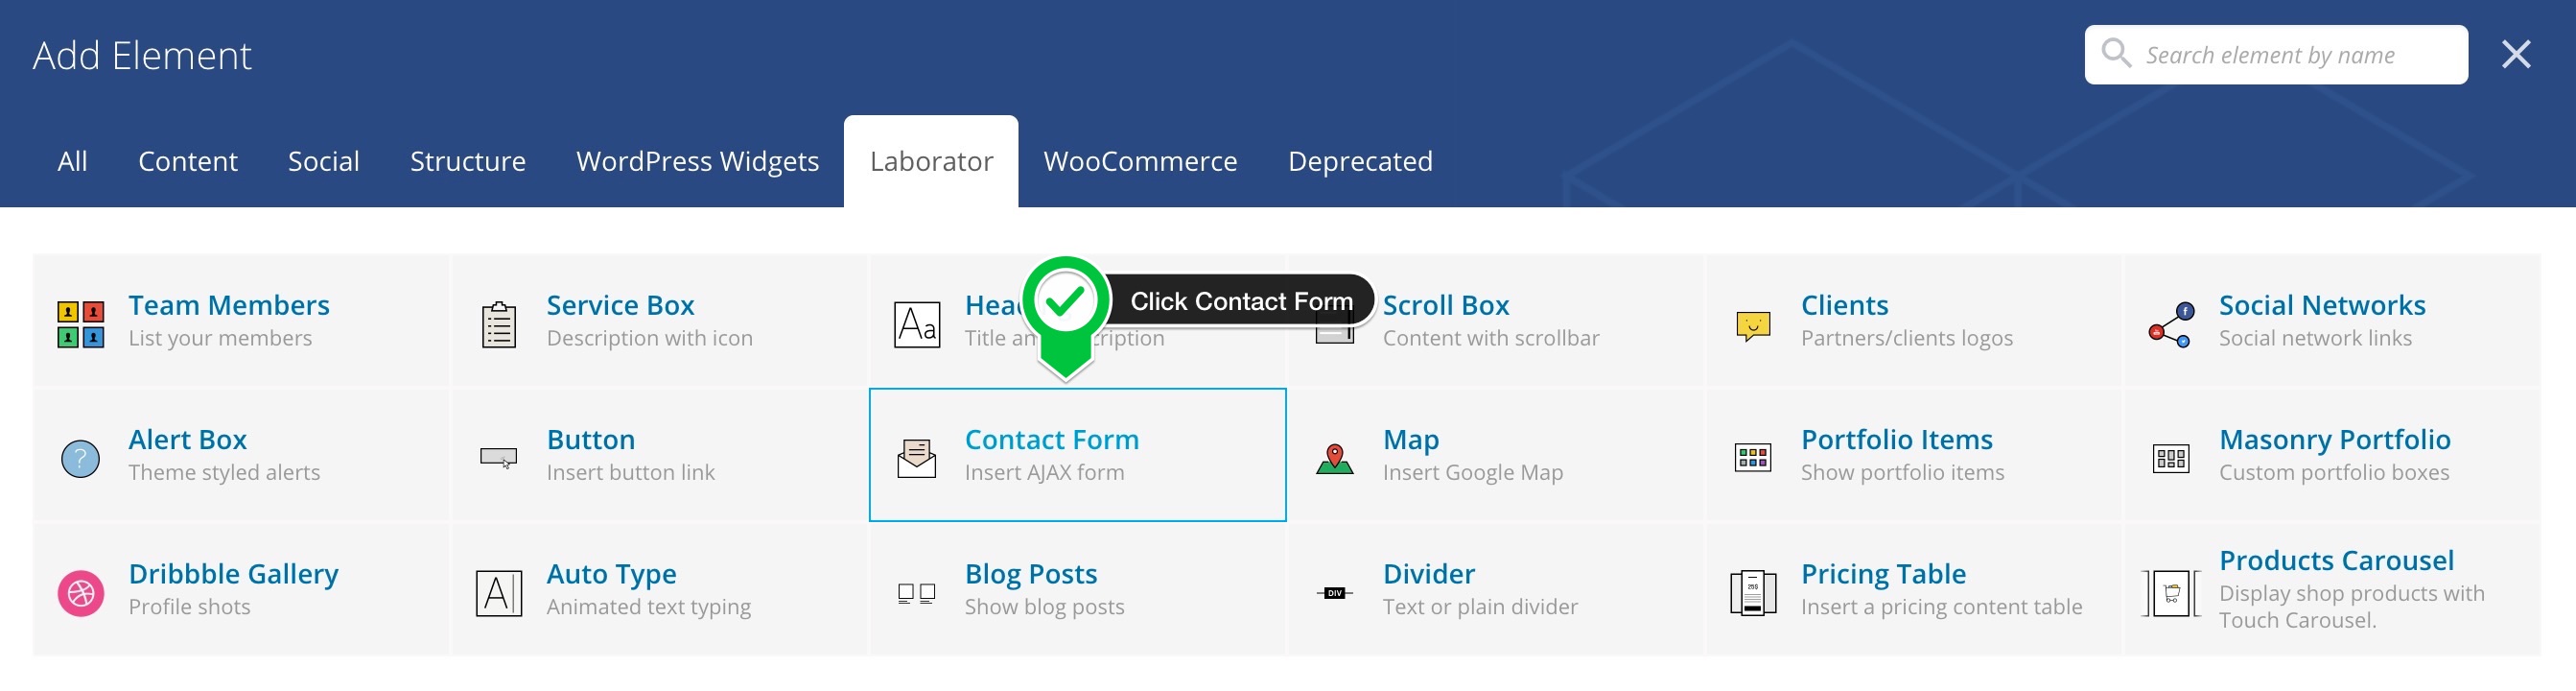
- Then when the Add Elements area appear just click the Laborator tab
- Choose Contact Form element.
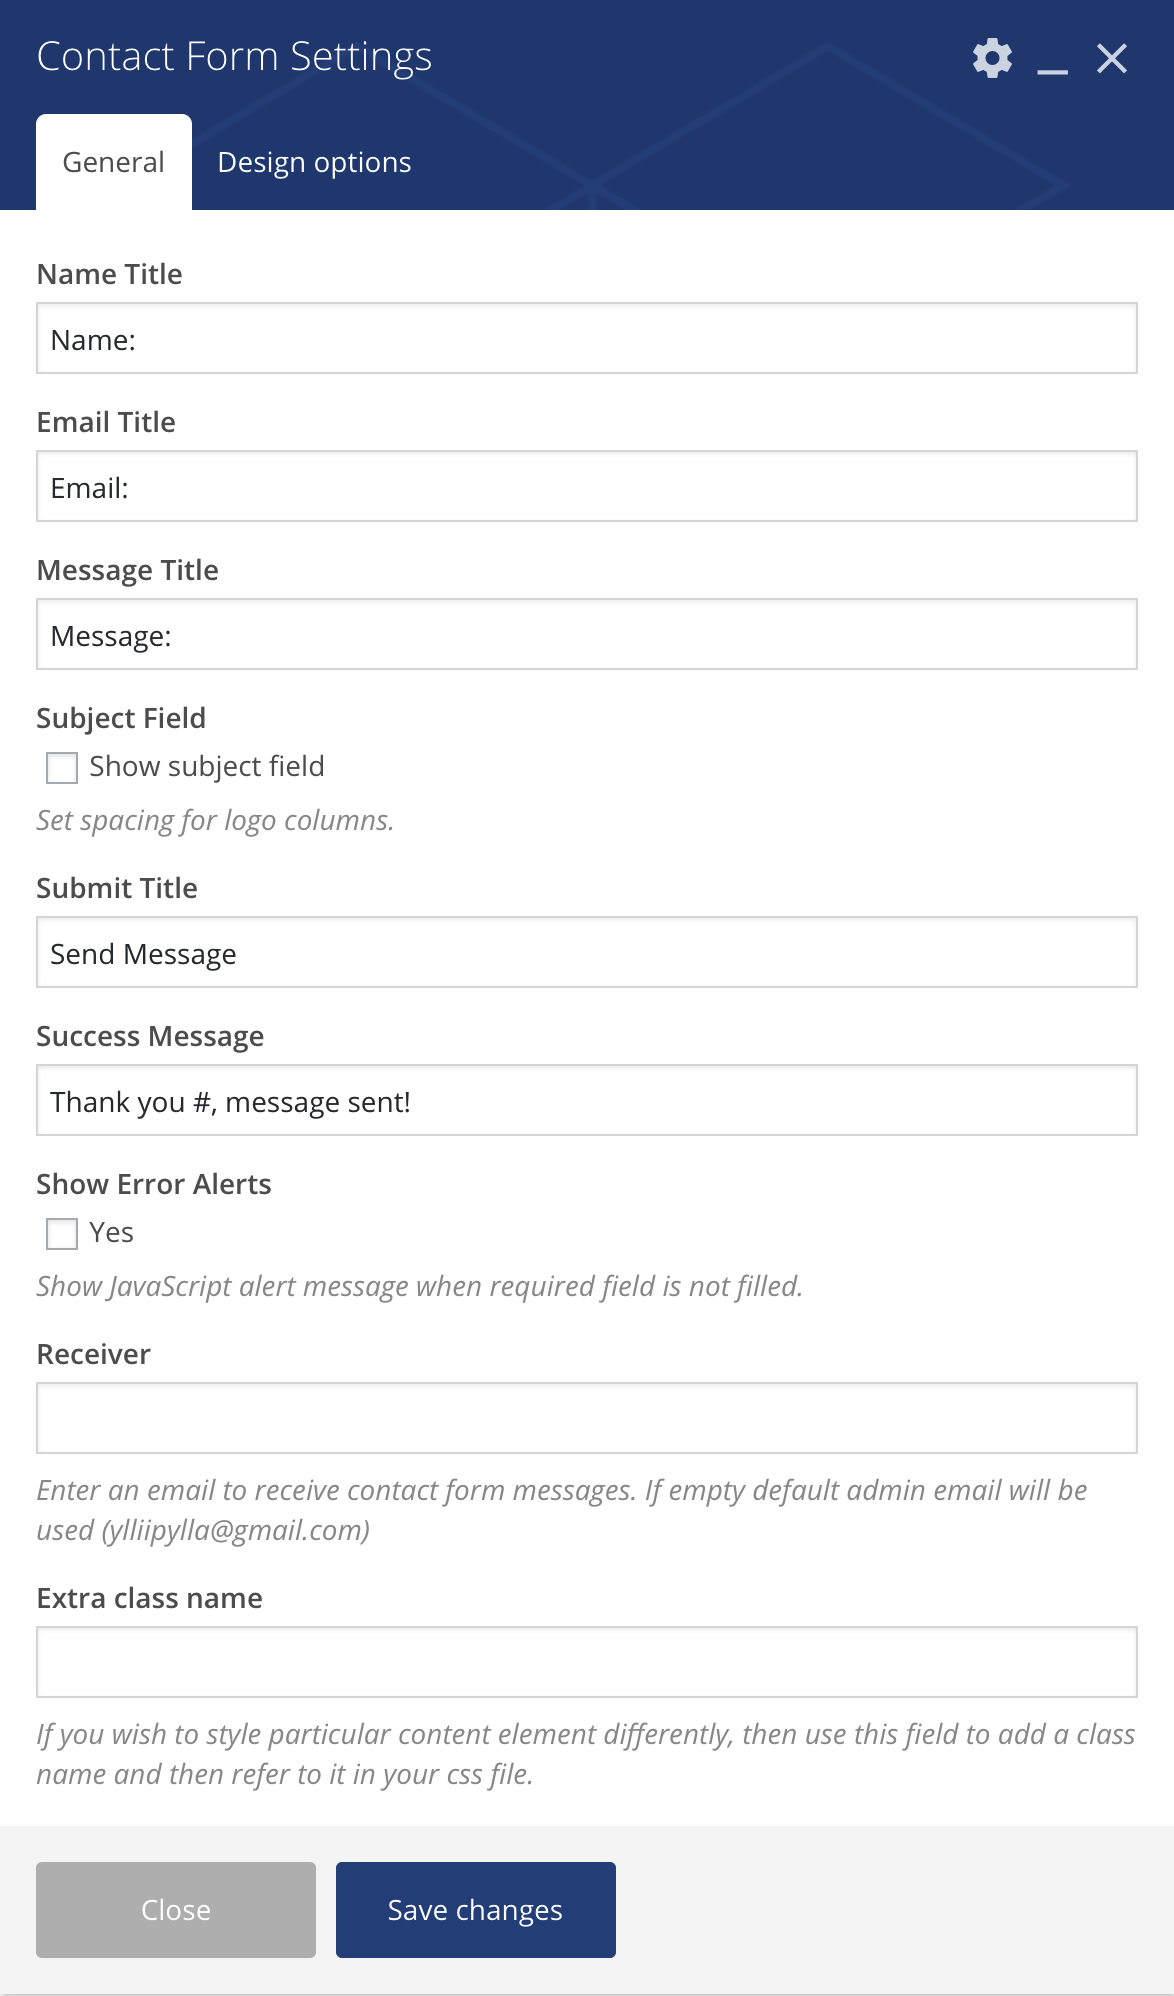
- Contact Form Settings popup will appear and the options to choose are those:
Contact Form Settings
- Name Title — Usually you will write in this area Name:
- Email Title — Usually you will write in this area Email:
- Message Title — Usually you will write in this area Message:
- Subject Field — Add a text that will appear automatically in the subject field when someone contacts you from there. User can change that later (Optional)
- Submit Title — Write the text that will appear on the button when users click the “submit” button.
- Success Message — Write the text that will appear when the user clicks the “submit” button (you can write Thank you #, message sent!)
- Show Error Alerts — This will show JavaScript alert message when a required field is not filled.
- Receiver — Enter an email to receive contact form messages. If empty default admin email will be used.
- Enable ReCAPTCHA — In order to use reCaptcha you must install and configure reCaptcha by BestWebSoft plugin (Optional)
- Privacy Policy — Optionally add text about your site privacy policy to show when submitting the form. You can also include links so users can be directed to another page where you have added privacy policy information.
- Extra class name —If you wish to style a particular content elements differently, then use this field to add a class name and then refer to it in your Custom CSS area. This field appears on every WPBakery Page Builder element.
If contact form doesn’t send emails please read this article Contact form doesn’t send emails.
ReCAPTCHA information
reCAPTCHA is a free service from Google that helps protect websites from spam and abuse. A “CAPTCHA” is a Turing test to tell humans and bots apart. It is easy for humans to solve, but hard for “bots” and other malicious software to figure out. By adding reCAPTCHA to a site, you can block automated software while helping your welcome users to enter with ease.
If you want to use this method on your theme contact form then please install WordPress ReCaptcha Integration plugin on your site.
The register your website through the Google reCAPTCHA admin page and then go to WordPress dashboard > Settings > ReCaptcha, there you can enter the public and private key in their fields.
Extra
You can add this code snippet to see how we have done the Contact page. Just make sure that you use Classic Mode > Text and paste the code below:
You then need to change map location, add a pin, and other things there.
Note: If you want something extra but you can’t do it with our Contact Form element, then Kalium also supports famous Ninja Forms plugin.
We just showed you how you can create a nice simple Contact page. Of course that there are unlimited possibilities to design your contact page with the help of WPBakery Page Builder (formerly Visual Composer) element, and we can’t wait to see what you can do 🙂